


Hi and welcome to my tutorial about how to change Loading Screen and make them custom!
NOTE: when you do the .MPQ file remember to name it (exampel)
patch-T.MPQ and not Patch-T.mpq (Big p=not working, small .MPQ = not working, small p and big .MPQ = working)
Programs needed:
Photoshop CS2, CS3 (Cant give out a DL link since we cant put out free programs)
MWCS (MyWarcraftStudios) This program can be downloaded at Curse.com but their version dosn't work so i will give out my version (Note: This has allwasy been a FREE program! Download: http://filebeam.com/e543e606fd6cec568f3766e8852044a1
also blp converter: http://filebeam.com/2b9ad7e31d2ded803425f605337942ae
STEP 1
Open up MWCS and pressand go into your Data folder inside your World of Warcraft folder! you see some .MPQ files you should go into the enGB or enUS folder then go into
(the selected one)
Done? Good Take a 2 min break!
ok lets get back to Work!
STEP 2
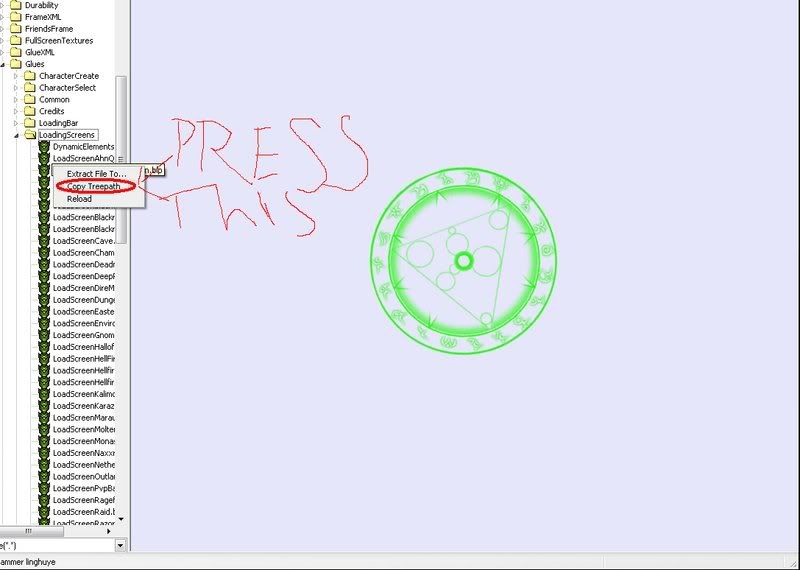
Go to(Interface > Glues > LoadingScreen) You will se a list of some loading screens there! all you do is to open Note Pad or Word Pad Copy The Treepath by right clicking on the loading Screen you wanna change!
Paste it in your Note Pad / Word Pad
Step 3
Now you done that we will do a new loading screen! take the pic you wanna change and modify it untill you like it! and now you change it's size to
512x512 (MUST BE THIS SIZE OR ELSE YOU WILL GET A GREEN SCREEN AND A CRASHING WoW!!!)
when you are done with that you make it to 1 layer and save it as a .png file
when you are done with that it is time to make it a .blp file (skin) you simply take your picture drag it to the BLP Converter and it will make you a .blp file!
Take a 2 min break!
Step 4
Now go to "Pack" in MWCS and select create new .MPQ archive
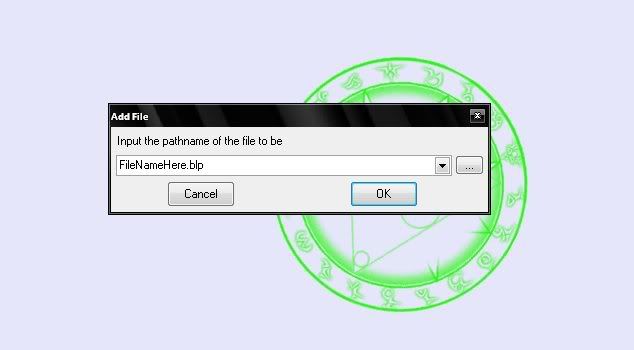
go into pack again and select add file to archive go to the folder where your .blp file is and select it and you will see this box
DO NOT press the "OK" button yet! Select all the text you see inside it and remove it and now we take our Treepath and paste it inside the box and press ok! Go to Pack and select Save and Close archive! Remembe to save the .MPQ file inside the Data folder and not the enGB or the enUS
Hope this was good! Took me 10 min to write it and fix the pics!
Dont forget to say Thanks
Made by LS12 do not copy this and paste on other sites without my premision! IF you do that without my premision atleast give me credits!

 Likes: 0
Results 1 to 8 of 8
Threaded View
-
09-02-09, 08:03 AM #1Scout


- Join Date
- Feb 2009
- Location
- 00110101 01110111 00110011 01100100 00110011 01101110
- Posts
- 9
- Post Thanks / Like

- Rep Power
- 18
- Reputation
- 32

[Tutorial] How to make Custom Loading Screens!
Last edited by LS12; 09-02-09 at 09:04 AM.


 Reply With Quote
Bookmarks