


 enegue
Weapon Creation
Weapon Creator - WoW Vendetta: Wage Your War
& for armor
Armor Creator - WoW Vendetta: Wage Your War
For models
Thottbot World of Warcraft:
Its really easy to make weapons, Hope you like it
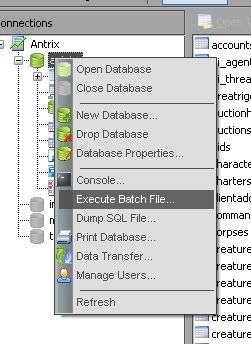
Once you have finished making it then Dling it open up Navicat, turn on antrix then right click it
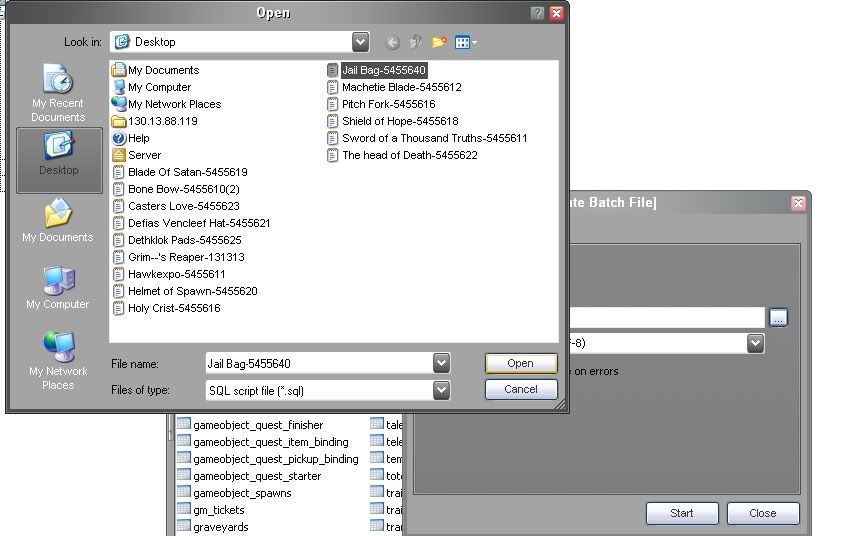
Once you have done this it should bring up a box on the middle right there should be a box with three dots, then clikc the item you are gonna import then click the open button
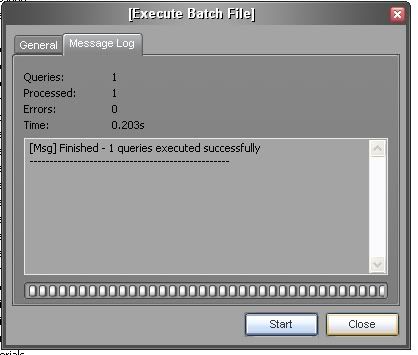
once you do that just press start and it should show like this
If it says anything with a bunch of crap then your weapon has something on it that you can't do
The next guide will teach how you how to create... CUSTOM PORTALS!

 Likes: 0
Results 1 to 10 of 22
Thread: [Guide] Server Guide and Risks
Hybrid View
-
10-01-09, 05:41 AM #1Contributor


- Join Date
- Aug 2008
- Location
- Before God
- Posts
- 715
- Post Thanks / Like

- Rep Power
- 19
- Reputation
- 106

Last edited by enegue; 23-02-09 at 05:11 AM.
-
10-01-09, 06:02 AM #2Contributor
- Join Date
- Aug 2008
- Location
- Before God
- Posts
- 715
- Post Thanks / Like
- Rep Power
- 19
- Reputation
- 106
Creating Portals
How to create a Portal (Antrix)
Making Game Object Stay Forever
This is a guide explaining how to effectively create a custom portal in an antrix server.
MUST READ!
There is a draw back to creating portals in antrix servers. In mangos servers, portals used areatriggers to port players to the desired areas, but in antrix servers, portals overwrite teleport spells and assign them to game objects. Thus forth, if you run out of teleport spells , then you cannot create anymore portals. In this guide, we will be overwriting the spell ID 11409 ( Teleport to Booty Bay )
: Step 1 : Creating the Teleport Spell.
>In this step, we will be updating a row in the DB<
Open up navicat and connect to your database.
Next, open up the table ' teleport_coords '
and here are the tables you will see
ID
These are the ID's of each teleport spell. Press CTRL + F and search for 11409 .
NAME
Here, you will see the name " Teleport to Booty Bay ", you can change this name to anything you want. In this guide, i will change it to "Tele to SW walls"
MAPID
Here is where you will need to enter the map ID that your portal will tele you to.
You can use .gps to figure out your coordinates. In this guide, i will use the map " 0 "
X
This is the X coordinate ( North and South ) I will use " -8918 "
Y
This is the Y coordinate (East and West ). I will use " 540 "
Z
This is the Z coordinate ( Or height ) I will use " 118 "
If you are unsure about this one, make sure you always round up a number or two, so that you dont port under the ground.
TOTRIGGER
This can be left at " 0 "
: Step 2 : Creating the Game Object
>In this step, we shall create the portal<
Open up the table Gameobject_names
You will see these fields:
ENTRY
This can be any number you choose, just make sure it hasnt been used already! In this guide, i will use " 18855 "
TYPE
This is the type of game object it will be. Since we want a portal, put " 22 " in this field.
DISPLAYID
This is the display / model of the gameobject. You can take your pick from here:
4393 = Darnassus
4396 = Stormwind
4394 = Ironforge
4398 = Undercity
4395 = Orgrimmar
4397 = Thunder Bluff
6956 = Silvermoon
6955 = Exodar
Since my portal will put you ontop of the stormwind walls, i will use " 4396 " for stormwind.
Sound0
This field is important! This must be the same number as the ID you used to create your Teleport spell. If you recall from the top of this guide, we edited the spell " 11409 ". So that is the number i will put there.
Sound2 to Unknown14
These fields remain at default " 0 "
: Step 3 : Spawning the game object.>Duh <
Here is the fun part, start up your server and log in on a gm account.
Now find an area you wish to place the portal, and use the command:
.gobject spawn 11409
11409 can be replaced with the ID you chose to create your GameObject with.
DO NOT MOVE ONCE YOU'VE SPAWNED THE PORTAL. This is vital for step 4
: Step 4 : Getting the object to stay forever.
>This step will ensure that the portal never fades<
>> THIS CAN BE APPLIED TO ANY OBJECT!<<
Assuming that you did not move when you spawned the game object, you should be on the same coordinate plane as the game object. What does that mean? Well, its simple. When you spawned the gameobject, it was assigned to a point on a coordinate plane ( X,Y,Z,O ), and since you didnt move, you are still on the same point as it. At this point, i want you to do a .gps to find out what coordinates you are on. now make sure you KEEP those points! If you know them, now you can move
Open up navicat, and open the table ' Gameobject_spawns '
And you will see these fields:
ID
This is a reserved space for your gameobject. Do not mistake this for your gameobject's entry ID! This is completely seperate. If you go to the end of the list, it gets pretty high. A free ID would be " 257655 " So that is what i will use.
ENTRY
This is the entry of the gameobject we created. Assuming you followed the guide, i would put " 18855 "
MAP
Here is where we use the Coords from the earlier .GPS command. The next 4 fields are up to you, it just places your gameobject on the map when you restart the server. Since im putting this portal near the tree in the trade district (SW) i will put " 0 "
X
This is the X coordinate that your gameobject will be placed on. I will use " -8824.19 "
Y
This is the Y coordinate that your gameobject will be placed on. I will use " 631.063 "
Z
This is the Z coordinate that your gameobject will be placed on. I will use " 94.0699 "
FACING
This is the direction your Gameobject will be facing. Please note that if you leave it at default ( '0' ), then it will be facing directly north. I will use " 3.79975 "
O1
This is an option field, but is not needed, so leave it at 0
O2
This is another option field, but is not needed, so leave it at 0
O3
Make sure this is set at 1
O4
Make sure this is set at 0
STATE
This is what type of state your gameobject will be in once its spawned. Since we want it at its normal state, put down " 1 ".
FLAGS
This is just another option you can assign to your game object, just leave this at 0.
FACTION
This is what faction will be able to see and use the portal. leaving it at " 0 " will allow all factions to use it.
SCALE
The size of your GO, i will use " 1 "
StateNPClink
If its linked to a quest or NPC, this field will be needed. But since it is not, leave this field at " 0 "
And there you go, once you restart your server, the gameobject will be placed on the coordinates you have chosen in the gameobject_spawns.
Next guide is to teach you how to create your very own vendors!Last edited by enegue; 23-02-09 at 05:13 AM.
-
10-01-09, 06:04 AM #3Contributor
- Join Date
- Aug 2008
- Location
- Before God
- Posts
- 715
- Post Thanks / Like
- Rep Power
- 19
- Reputation
- 106
Making your own Vendors
Hello, there was a request on how to make your own vendors, so I decided I would write a little guide to help everybody out. First off, I would like to point out that this guide is for ANTRIX - NAVICAT and ONLY for Antrix - Navicat servers (I haven't used SQLyog before, so I don't know about it)
Okay, open your Navicat and go into 'mysql' Then go into 'Creature_name'. Click the '+' to make a new entry, add in an un-used Entry number, Name, Subname, Set 'Flags1' to 0, 'Type' to 7, set the DisplayID to whatever you want (You can go through the pages and find an NPC with the DisplayID you want, then right it down in Notepad) then put whatever you want in the other categories, doesn't matter.
Click the Checkmark to save, close that window, and open 'Creatures_proto' and make the Entry number the same as the 'Creature_name' Entry number you used, put whatever level you want, and set the faction to 35 (Faction 35 makes the NPC Friendly to both Horde and Alliance) make the Health and Mana whatever you want them to be, same with the scale, but set the NPCFlags to 7. The rest is up to you. (Also, be sure that 'Auras' (Should say (MEMO) ) says 0, If you have SQLyog - Thanks, Fenryr)
Go into your WoW folder, delete the 'Cache' folder, start up your server again, log in, and use .npc spawn for your new NPC, and check to see if it is a vendor (If not, please post here and I'll fix it, I'm not on my computer that has the server on it) but you shouldn't be able to open the Vendor Page, only have the object to buy from your new vendor. Find the ID of the item you want to add to your vendor, and type .npc vendoradditem ##### While targetting your vendor, then try opening the vendor page, and voila! You can add any other items, and I know there's a way to do it in Navicat, but I can't exactly check right now >.>
Next guide is to teach you how to create a website!!!!!
Last edited by enegue; 23-02-09 at 05:13 AM.
-
10-01-09, 06:05 AM #4Contributor
- Join Date
- Aug 2008
- Location
- Before God
- Posts
- 715
- Post Thanks / Like
- Rep Power
- 19
- Reputation
- 106
Creating a Website
http://www.************/forums
Ok im sure loads of you want to have an account creation page. With pics, downloads the whole lot to help us noobs out there. (uploadin on other sites also)
I would advise to get this
/how-cr...ght=beta+mysql
Step 1
Ok first's thing first download the account creation site folder: http://www.megaupload.com/?d=800JC17V or Send big files the easy way with sendspace. Files too large for email attachments? No problem!
Note:You don’t need a repack for this
Then un zip it and place it on your desktop or where u want.
Step 2
Go into diskw, then diskw again then go into the WWW folder.
1) In there click on config. (open it with notepad)
Change the user, pass and the database to your SQL stuff and realm database. Save it and close that.

2) Click on realmlist.wtf and open it with notepad again. CHange it to set realmlist (your ham ip or your computer ip / can be a thing like yourserver.ath.cx) Save that then close it.

Step 3
Start your server up as u would do normally, go into diskw and click on Start.
Then place your ham ip / comp ip or the yourserver.ath.cx in your web browser. And your done.
Any problems post a reply.
P.S: it should look like this:

Last edited by enegue; 23-02-09 at 05:13 AM.
-
10-01-09, 06:08 AM #5Contributor
- Join Date
- Aug 2008
- Location
- Before God
- Posts
- 715
- Post Thanks / Like
- Rep Power
- 19
- Reputation
- 106
Credits
Resource Credits
-> WoWLegend
-> Hawkexpo
-> Gastricpenguin
-> 2dgreengiant
-> Errage
Guide Credits
Credits to someone at *******... Will find his name ASAP!
Last edited by enegue; 23-02-09 at 05:14 AM.
-
10-01-09, 12:06 PM #6Grunt


- Join Date
- Dec 2008
- Posts
- 43
- Post Thanks / Like
- Rep Power
- 18
- Reputation
- 12
 omg
omg
Omg, Nice guide Ludo, This will be Very useful,
You Can also Make Quests/NPC/Items/armor
Using ADE (ascent database editor)
Or FDE (Use FDE For ArcEmu)
They Are very useful, and implement the item into the colums without having to execute a batch file, and there very simple to figure out,
Good job ludo +Rep ~----------------------------------------------------------------------~

 Reply With Quote
Related Threads - Scroll Down after related threads if you are only interested to view replies for above post/thread

Posting Permissions
vBulletin Licensed to: MMOPro.org
Bookmarks